What you need for a first try
Shaving-cream marbling is a good introduction to decorative paper because you can see a pattern forming before you commit it to the page. The shaving cream holds drops of color near the surface; when you press paper onto it, the pattern transfers. Each print comes out a little differently, and you can make several without setting up a large craft station.
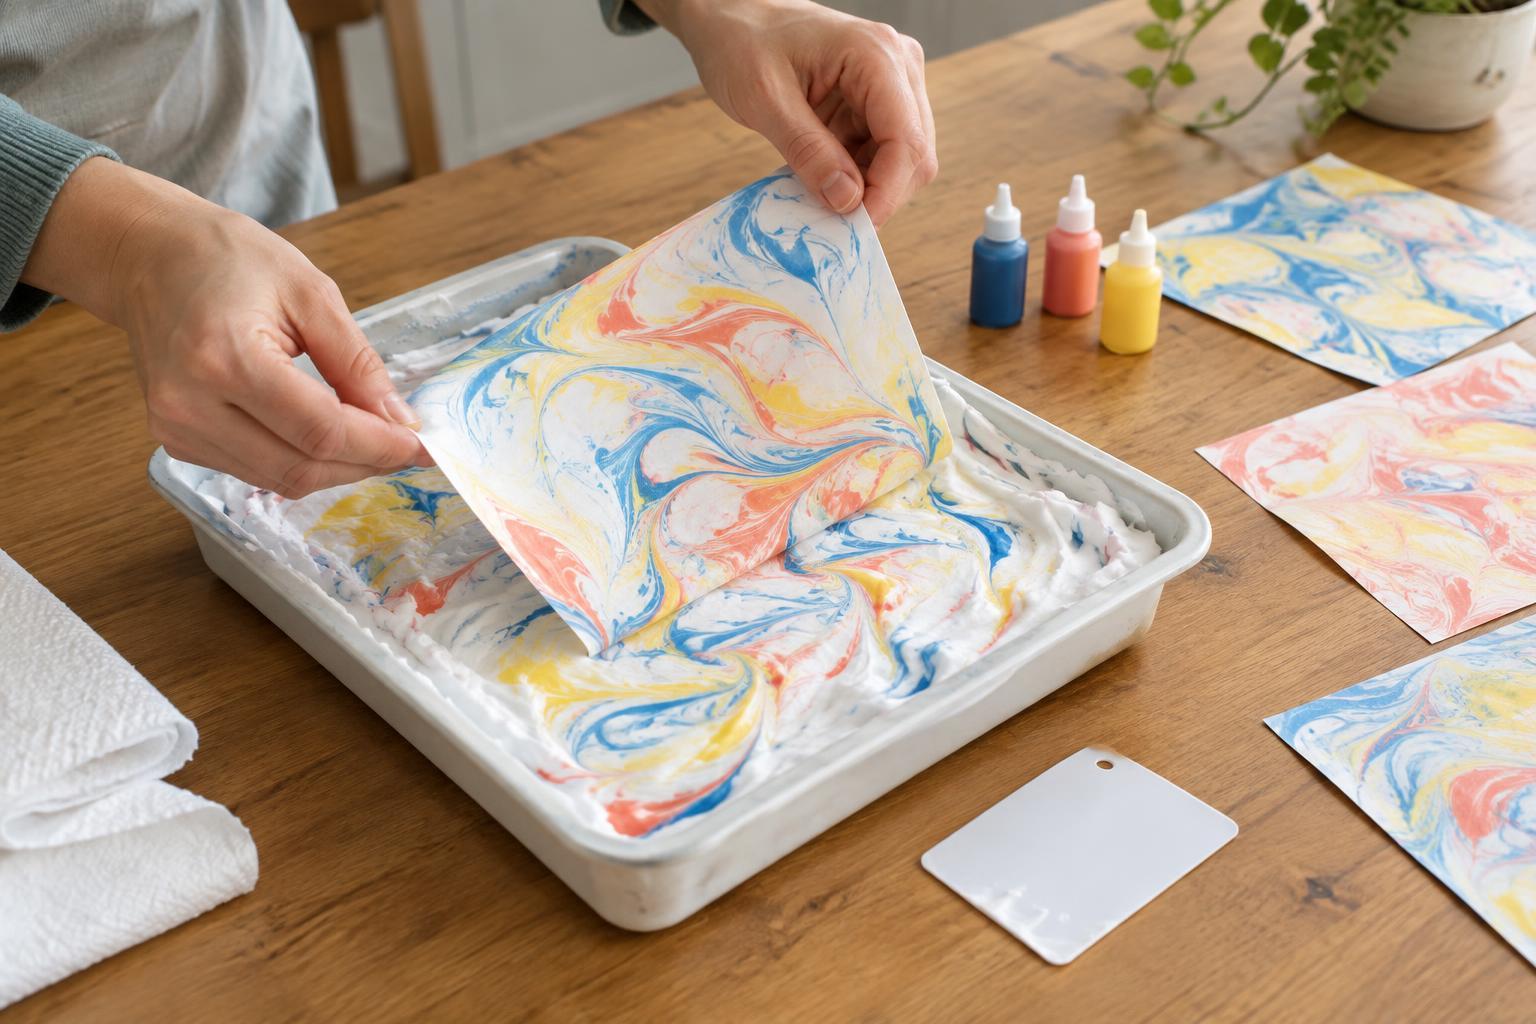
Gather a shallow tray or baking dish, plain foaming shaving cream, a few colors of food coloring or washable liquid watercolor, a toothpick or skewer, and paper cut small enough to fit inside the tray. You will also need an old plastic card or a piece of stiff cardboard for scraping, paper towels, and a protected place where prints can dry. Ordinary printer paper works for a trial run, though slightly heavier paper is easier to handle while damp. Skip shaving gel: the goal is a fluffy layer of foam that stays spread out in the tray.
Choose just two or three colors at first. Food coloring is inexpensive and often already in the kitchen, but it can stain hands and work surfaces. Cover the table, wear clothes you do not mind splashing, and keep the supplies away from food preparation. If using an aerosol can, follow its label directions and spray in a ventilated space rather than close to your face.
Build a pattern without overmixing
Shake the shaving-cream can if its instructions call for it, then dispense enough foam to cover the bottom of your tray. Spread it into a fairly even layer with the back of a spoon or your card. It does not need to be perfectly smooth, but large peaks can leave blank spots where the paper does not touch.
Add small, spaced-out drops of color across the foam. Drag a toothpick through the drops in loose lines, loops, or figure eights. Make only a few passes at first. The most common beginner surprise is that a lively swirl becomes muddy when the colors are stirred together too thoroughly. You are arranging color on the surface, not blending a new shade throughout the cream.
Before using a sheet you want to keep, try a small scrap of paper. It will show whether you need more color, gentler swirling, or a flatter bed of foam. If your colors look faint, add a few more drops rather than pouring in a large amount at once. Different colorants and papers transfer differently, so a quick test is more useful than aiming for an exact recipe.
Print, scrape, and let the paper dry
Lay one sheet gently onto the patterned foam. Press lightly across the back with your fingers so the whole sheet makes contact, without rubbing it around. Lift it from one corner and set it cream-side up on your protected work surface. At this stage the design may be hidden under a thick white coating; that is normal.
Hold the paper steady and pull the edge of your old card across it in one smooth motion to remove the foam. Wipe the card before making another pass if needed. Scraping reveals the marbled pattern and helps keep the paper from staying overly wet. Set the print somewhere flat to dry completely. If an edge curls afterward, place the dry sheet under a few books with clean paper on either side; avoid pressing it while it is still damp.
The foam left in the tray can often take another round of color. Level it gently, add a few fresh drops, and swirl again. As colors accumulate, later prints may become softer or more blended. Treat that as a different look, or start with fresh foam when you want crisp separation between colors.
Troubleshoot and use your finished sheets
If a print has white gaps, check that the foam layer is even and that you pressed the entire sheet onto it. If the paper tears or feels soggy, use a heavier sheet, press more lightly, or scrape sooner. Muddy patches usually mean the colors were swirled too many times. For more distinct marks on the next attempt, use fewer drops and leave visible areas of white foam between them.
Once dry, the paper can become a greeting-card front, a bookmark, a gift tag, or a background for a small collage. Cut around your favorite section rather than feeling obliged to use the whole sheet. A simple set of matching tags is an approachable first goal: make several prints in the same color family, then trim the best areas into shapes.
When you are finished, wipe excess foam into the trash before washing the tray and tools according to their care instructions. Check the work surface for stray color while it is still easy to clean. Keep one test print as a reminder of what worked; the next session can be as simple as changing the color pair or trying a different swirl.